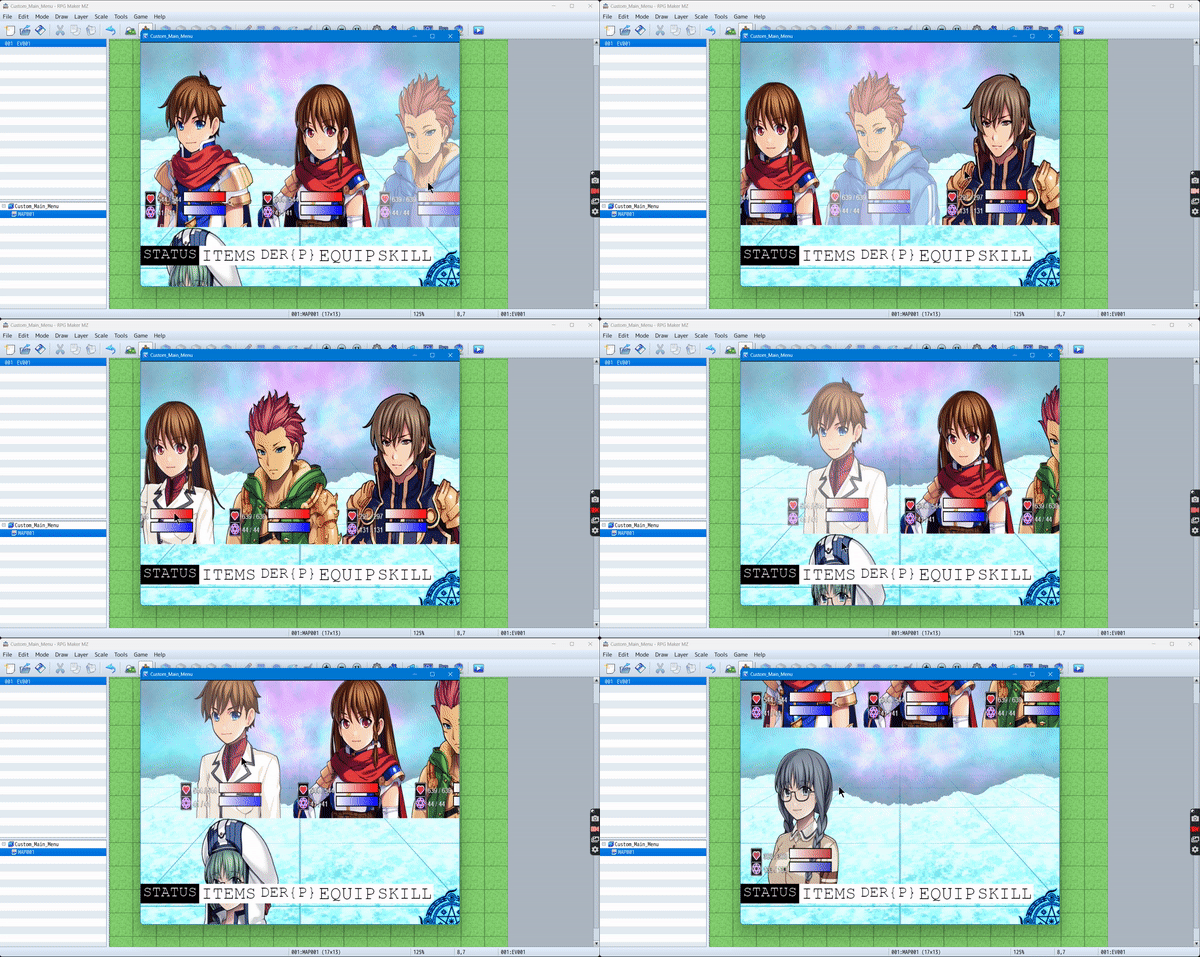
RPG Maker MV/MZ: Main Menu Builder
- Custom button setup with mouse over effect
- Touch/Keyboard friendly
- Scrolling portrait (Can touch and hold to drag portrait around) setup with mouse over effect.
- Custom Variable display
- Multiple background setup
- Multiple foreground setup
- Control background/foreground alpha, pivot point, rotation, blend mode, etc
- Setup resource values to show (HP, MP, TP) including drawing gauges.
- Setup status effect button to display status effects.
Please Note: Some of the graphics used in the demo project are a mix of MV and MZ. Relevant terms apply.
Custom main menu maker allows for game designers who have that artistic hand (Unlike myself) to create very stylish main menus for their project. This creates a custom main menu only. All other menus are very much the same unless modified. It features high cross compatibility but ignores any other plugin modification to the main menu scene as it uses its own scene for the main menu.
You will be required to setup your own buttons as RPG Maker default options do not come preloaded. As such, please refer to the demo project provided or the guide below.
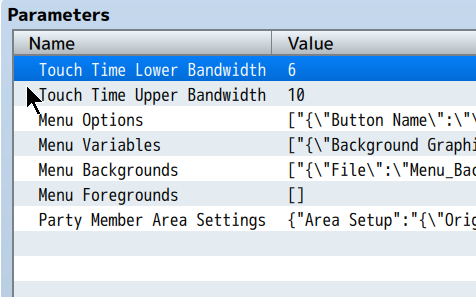
- Touch Time Lower/Upper Bandwidth controls the touch time before touch input registers a scene change.
- Menu Options are used to setup the menu buttons for the menu scene.
- Menu Variables are used to setup game variables to display on menu scene.
- Menu Backgrounds are images shown behind the portraits, buttons and variables. A theoretical limitless amount can be set. Please respect hardware limitations.
- Menu Foregrounds are images shown over the portraits, buttons and variables. A theoretical limitless amount can be set. Please respect hardware limitations.
- Party Member Area Settings is used to setup the portrait display properties (eg: Gauges, maximum portraits,
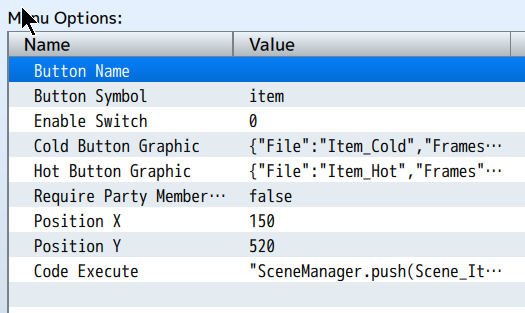
- Button Name may be left blank if you do not want the name to be drawn over the button. (Recommended)
- Button Symbol is the reference string for the button. Try to keep unique.
- Enable switch may be used to enable or disable the button display. If zero (0), the button will always display
- Cold/Hot Graphic refers to the graphic used when the button is not mouse over/is mouse over.
- Require Party Member allows for player to select portrait of battler before doing scene transition.
- Position X/Y is the screen position of the button.
- Code Execute is the code to be executed when the button is triggered. For RPG Maker this usually means a transition to another scene, but you can make it anything you need.
When using this plugin to setup buttons for scene transition, you will want to know the name of the scene to transition to. You can find out this by going to the scene normally in game and then open the console and run this string of code:
SceneManager._scene
In the console, after running the command, the scene object should show up:

You do not need to expand anything. The name of the scene pulled up here is: Scene_CustomMainMenu
In code execute, if we want to transition to this scene, we type the following:
SceneManager.push(Scene_CustomMainMenu)
And this will do nothing significant because the scene we are on is the Custom Main Menu Scene.
Example Scenes to transition to include but are not exclusive to:
- Scene_Title
- Scene_Map (Instead of SceneManager.push, use SceneManager.goto)
- Scene_Item (May require party member select)
- Scene_Skill (May require party member select)
- Scene_Equip (May require party member select)
- Scene_Status (May require party member select)
- Scene_Options
- Scene_Save
- Scene_Load
- Scene_Gameover (Why?)
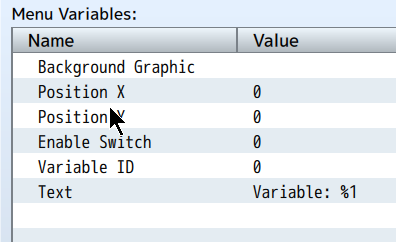
Menu Variables are drawn above the set background graphic and not inside a window. The font used is the game font. Variable ID refers to the selected game variable to be used.

- File is the graphic file used for the background image.
- Alpha refers to the image transparency.
- Blend Mode can only be normal, add, multiply or screen as per WEBGL limitation.
- Position X/Y refer to the graphic offset.
- Anchor X/Y refer to the graphic pivot point.
- Rotation will rotate the graphic, constantly if constant rotation is selected.
- Scrolling X/Y will move the image graphic origin point continuously.
Menu foregrounds are setup in the same way.
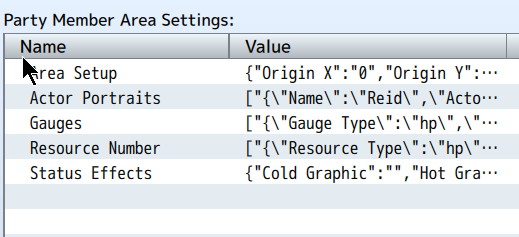
- Area Setup will determine the dimensions for the portraits as well as size
- Actor Portraits will allow setup for each actor portrait graphic.
- Gauges and resource will allow for resource display of HP, MP and TP
- Status Effects refers to the button graphic for displaying status effects on that actor.
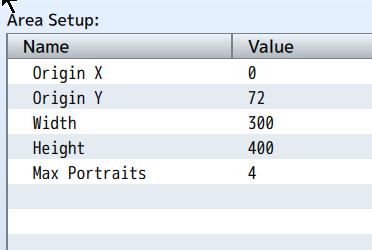
Origin X and Y refer to the starting point for the portrait area whilst Width and Height refer to the size of each individual portrait. Max Portraits will determine how many portraits are drawn per row.

Actor is the ID of the actor the portrait settings will apply to. Cold will be with no mouse over whilst Hot is with mouse over. Name does nothing.
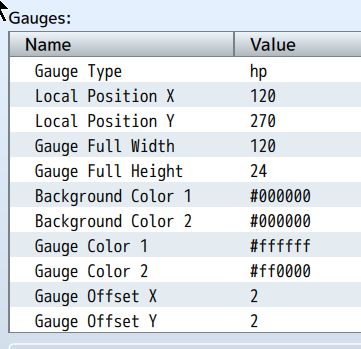
- Gauge Type may be HP, MP or TP
- Local position X/Y refers to the position on the portrait itself and not the screen.
- Gauge Width/Height refer to the gauge size
- Gauge color uses hex code. Refer to here for examples.
- Offset X/Y refer to the inner active gauge offset. Two (2) will show a 2 pixel black border based on above settings.
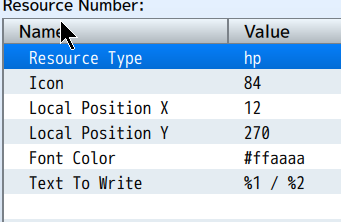
- Resource Type can be HP, MP or TP
- Icon is the icon index from icon sheet.
- Local Position X/Y refer to the position on the portrait, NOT on the screen.
- Font color uses hex code in above example.
- Text To Write can be customized based on project requirements.
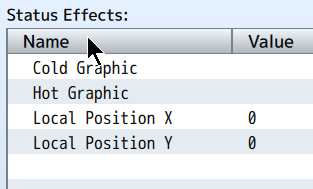
The status effects button Cold/Hot graphic refers to the graphic used when mouse over or not. Local Position X/Y refer to the position on the portrait, NOT on the screen.
| Status | Released |
| Category | Tool |
| Author | Synrec |
| Genre | Role Playing |
| Tags | 2D, Graphical User Interface (GUI), RPG Maker |
Purchase
In order to download this tool you must purchase it at or above the minimum price of $5 USD. You will get access to the following files:
Development log
- v1.2 - Some further fixesJan 05, 2024
- v1.1 - Some patchesJan 05, 2024
- Make your own custom main menuMay 25, 2023
