RPG Maker MV/MZ: Bullet Hell Maker
Star Shooter is a divergence from your typical RPG Maker RPG scene yet at the same time marries nicely with most modern RPG games which have a flight scene tacked on here and there.
Star shooter is a rather complex plugin (especially for MV users as the plugin command feature is really lacking) but at the same time, once you get it, it's rather easy to setup.
First off, the features:
- Top-down and Side-view modes
- Extreme compatibility with external plugins
- Projectile setup and equip system with graphic modifier
- Variable control system, can configure ship status via game variables
- Multi-layer background configuration
- Victory and Defeat event setup
- Can setup flying to different maps
- Can configure game length
- Can setup survival mode
- Can setup clear mode (Must defeat all enemies within count down or battle lose)
- Score variable saved to game variable, game designer can choose what to do with it
- Can configure collectables which restore HP or Energy, boost stats or modify equipped projectile (normal or special)
- Completely free to modify the UI (no code experience at all required). If no UI is configured, nothing shows during the star shooter mini-game
- Automatically fades and hides UI elements based on player and enemy location on screen

TERMS OF USE
- Credit is given to Synrec/Kylestclr/Juno.
- Not for redistribution for educational use.
- Plugin is intended for use in the game "Juno" or in playable games
which are intended for commercial use.
- Plugin may be used in free games provided that it is compiled
in such a manner where the code is not openly distributed for free.
- Commercial distribution of playable games with this plugin are allowed.
- Not for use for harassment or defamation in any way nor is it
to be included in games which engage in such.
Recommended to use with the PRELOADER plugin
After purchasing and installing by placing the plugin into your ./js/plugins/ directory, open the RPG Maker MV or MZ plugin manager and load the plugin.

Our goal is to get from the above to the plugin configuration below:


Let's start with the simple stuff first
- Touch Input: Enable if you want touch input in your project. Touch Input works by allowing the player to click/touch the screen to attack and move towards the point. Unlike key input, touch input has to be a bit more precise so it may be slower to move but far more accurate in its stop location whereas key input has some drift. In short, key input has fast movement but drift, touch input has slow with no drift.
- Top-Down Mode: Enables by default or (if using MZ) via plugin command or via script call ($gameTemp.setTopDown(true)) Top down mode enables a vertical gameplay rather than a horizontal style. There are also options in the enemy and player configuration you will need to setup if using top-down mode. Player projectiles will default move upwards whilst enemy projectiles will default move downwards.
- Game over: This allows you to go directly to the game over scene when the player ship is destroyed. Defeat event will not play if this is enabled either via plugin command or via script call ($gameTemp.setGameoverStarShoot(true))
- Collision Animation: The animation that plays on the battler if they take collision damage. If there is no collision damage, nothing happens. Collision damage is dependent on the defense values of the player and colliding ship
- Death Animation: The default death animation to play. Ship is removed after the animation finishes playing.
- Game Score Variable: The variable the game score is stored in.
And that was the easy stuff, once you configure the above, we'll move onto the intermediate stuff

First we'll configure the player which has a lot of overlap with enemy configuration

First thing to do here would be to configure the five (5) parameters (HP, EP, ATK, DEF and SPD) and their associated variables.
- HP: Influences ship durability, if this hits zero, the ship dies.
- EP: Determines the energy available to the ship, you can configure certain projectiles to have specific energy cost
- ATK: Used in damage calculation, refers to the power of the ship
- DEF: Used in damage calculation and collision, references to the defense of the ship
- SPD: Used in movement speed calculation
After setting up the variables, you now want to configure the death animation (scroll all the way down), the default projectiles and the game variable which selects it:
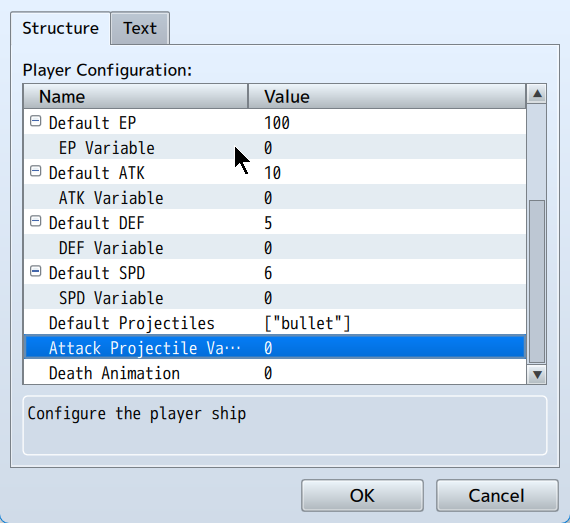
- Default Projectiles: Basically a list of projectiles which can be selected using the set Attack Projectile Variable
- Attack Projectile Variable: The game variable which chooses the attack projectile for the player.
- Death Animation: Overrides the default death animation
After doing that above, you want to now setup the graphic data for the player
- Graphic: The player ship graphic, also determines the size of the ship. Use minimal blank space in your image as it determines the collision size of your ship as well.
- Graphic Top Down: Same as Graphic but alternatively for top down mode.
- Valid Graphic Suffix: This is an array of valid bitmap suffix for the graphics (normal or top down). When you setup a projectile, if it has a bitmap suffix and it is included in this list, the name for the ship graphic changes and as such, you must have the file with the ship graphic name + suffix ready and it must have the same number of frames.
- Frames: You can use this to set the number of slices the bitmap width will have for animation strip purposes. Animation goes linearly and does not cycle backwards.
And that was player configuration. It's rather long but that's only because we can jump into enemy configuration right after

Enemies are configured individually after which you can spawn a number of them during your game setup. This lets you be able to setup enemies once and be done with it.

From the start you should notice that enemies do not have game variable settings as well as each configured enemy must carry a unique name. The unique name is very important for locating the configured enemy data else it would use the first found data in your enemy list.

Unlike the player, enemies have no special attacks nor do they have a variable which controls what projectile they will use. Instead, enemies will cycle through their projectiles from the first to the last in that loop.
- Projectile Cycle: The duration of which projectile attack in frames. When the cycle is complete, it moves on to the next projectile in the list, provided it is valid.
- Score Points: Score awarded for destroying the enemy
- Move Pattern: Custom controls for enemy movement. If not set, enemy moves from right to left or from top to bottom (top-down mode)
Move pattern configuration must have at least one move pattern which is a wait command and if that wait command is called, the duration of that move is used.
Move patterns can be combined (up + left, down + right) but opposing moves will nullify both (up + down, left + right)
NOTE: Boss configuration is the same as enemy configuration. The difference with bosses is that if they go off screen, they re-appear on the opposite size of it.
Player, enemies and bosses have been set up, what's left now would be projectiles and collectables and that's it for the intermediate. What? Don't tell me you forgot about the UI setup already?

Ah projectiles. You can configure the release of multiple projectiles under a single defined projectile group (Pay attention to the unique name)
- Unique Name: Used to identify the projectile group, if duplicates are used, it will pull the first found group.
- Cost: The EP cost of using this projectile group
- Cooldown: After using a projectile, start a cooldown (in frames) before it is possible to attack again
- Projectiles: Configure the actual projectiles released.

Formula works similarly to RPG Maker's default formula but instead of the full suite of parameters, you have the user (a), target (b) and variable data (v)
The list of available parameters are as follows:
- a.hp | b.hp : Current HP
- a.mhp | b.mhp : Max HP
- a.ep | b.ep : Current EP
- a.mep | b.mep : Max EP
- a.atk | b.atk : Current ATK
- a.def | b.def : Current DEF
- a.spd | b.spd : Current SPD
- v[n] : Variable data value where n is the variable index
Angle refers to that initial offset angle value at start. All projectile graphics must be aimed facing towards the right

Projectiles constantly move forward in the direction of their rotation value (not graphic, the code won't know if your projectile is rotated a certain way!)
For Top-down battle, the projectile is rotated by negative Math.PI/2 radians for players whilst for non-top-down battle, it is kept as is. Enemy projectiles are rotated by Math.PI radians from the player.
In all instances, the projectile moves forward in the direction of the rotation.

Graphic ship is an assistant ship which when spawned, resets projectile data and creates a ship which constantly fires for the projectile duration.
- Ship Offset X: Shifts the assistant ship on the horizonal axis relative to main ship
- Ship Offset Y: Shifts the assistant ship on the vertical axis relative to main ship
- Ship Frames: The number of frames for the ship graphic
- Ship Rate: The firing rate for the ship

Just a few more things to unpack with projectiles...:
- Speed: How fast the projectile moves
- Duration: How long (in frames) the projectile lives for
- Contact Life: The number of times the projectile can make contact before expiring
- Move Configuration: To apply linear or angular move modification

There are two types of configuration, linear and angular. Linear only applies additional speed in the projectile's direction whilst angular modifies the projectile's rotation.
- Duration: How long in frames the movement lasts. Only the wait = true value is used.
- Wait: Will wait for movement duration to expire before checking other moves
- Radius: Applied for angular move, applies a radians value to the current rotation over the duration time.
- Speed: Applied for linear move, further applies directional movement
- Rate: The update rate for move configuration. Only wait = true value is used.
The move configuration will take the current move and add it to an array of applied moves until a wait = true move is reached. After this, it will apply all the moves within that array over the course of the move duration.
Once you setup projectiles, the last are the collectables.

Collectables allow you to restore HP and/or EP, buff ATK, DEF or SPD and modify projectile and special projectile settings The configuration for them is as follows:

As always, respect must be paid to the unique name. Failure to keeping names unique can lead to bad data loading.
- Default HP, EP, ATK, DEF and SPD are used to apply recovery (HP/EP) or buffs (ATK, DEF, SPD) to the player. The buff duration lasts for the entirety of the battle.
- Move SPD refers to the speed of the collectable
- Animation Contact is the animation that plays when the collectable and player collide
- Set Projectile changes the normal attack projectile of the player.

- Set projectile special changes the special attack for the projectile if the name is valid
- Move pattern inherits the same behavior from enemy move pattern so please refer to enemy configuration for more information.
And that's it!
We've configured the easy stuff, the intermediate stuff and now it's time for the advanced stuff, UI configuration

There are several UI configurations which will differ based on your project's resolution but other than that, I'll run through the general settings found in each:
- Position X/Y: Sets the position of the UI element
- Background: Uses a static image for the background, can be offset with Background X/Y
- Graphic: A tile-able graphic which can be set to scroll in X/Y or rotate.
- Gauge: Requires setting a gauge background before setting the actual gauge itself, remember to minimize using empty space and use linear gauges.
- Text: Font size, color, face and offset can be modified
And that's it.
For MZ users, the guide can end here as all you have to do is go into the plugin command for whatever even you want to call the star shooter mini-game and boot it up.
For MV users... let's go over the script calls
- $gameTemp.setStarBackground(name) : Sets the background configuration to that set in the plugin parameters
- $gameTemp.createStarShootEnemies(name, count, x, y, spawn_time, spawn_rate): name must be wrapped in quotation marks, eg: name => "name", count refers to the total number of enemies spawned, x and y are the spawn coordinates, spawn_time refers to the time (in frames) since scene start that the game that the spawning begins and spawn_rate refers to the time between each spawning
- $gameTemp.createStarShootCollectables(name, count, x, y, spawn_time, spawn_rate): Same as above
- $gameTemp.setStarShootBGM(name, volume, pitch, pan): Sets up scene BGM
- $gameTemp.setStarShootBGS(name, volume, pitch, pan): Sets up scene BGS
- $gameTemp.createStarShootBoss(name, time): Spawns boss at time (in frames)
- $gameTemp.setStarExit(map, x, y, dir, victory_event, defeat_event): If victory, will play victory event and transfer player to map with x and y. If defeat will retain current location and play defeat event if game over is not enabled.
- $gameTemp.setTopDown(bool): bool = true/false, enables or disables top-down mode
- $gameTemp.setGameoverStarShoot(bool): bool = true/false, enables or disables game over
- $gameTemp.setEndTime(frames): Sets the game to end in frames.
Purchase
In order to download this tool you must purchase it at or above the minimum price of $25 USD. You will get access to the following files:
Development log
- v2.5 - Minor but sorta useful67 days ago
- Reuploads - Demo ErrorMar 02, 2025
- v2.4 - Top DownFeb 13, 2025
- v2.3 - Unset moving backgrounds/foregroundsSep 19, 2024
- v2.2 - Movable backgrounds and foregroundsSep 12, 2024
- v2.1 - Top-Down Player StartJul 13, 2024
- v2.0 - Damage Add-on GraphicsJun 04, 2024
- v1.9 - Status effects (Edited2)Jan 31, 2024