A downloadable tool

Buy Now$25.00 USD or more

Remember those old days where you would go outside, enjoy the sun on your face and spin some tops in the mud?

I certainly don't remember the first two but I do remember spinning tops and that's what this plugin for RPG Maker MZ allows you to do!

FEATURES

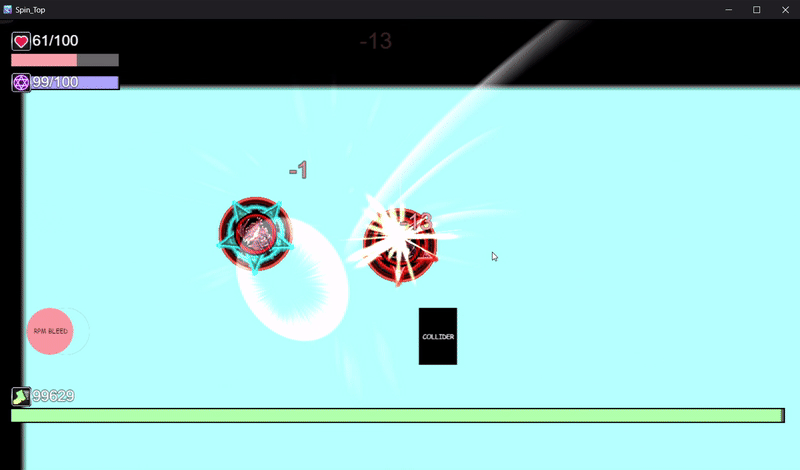
  • Speed based collision mechanics
  • Arena ring-out, launch your opponents out the arena
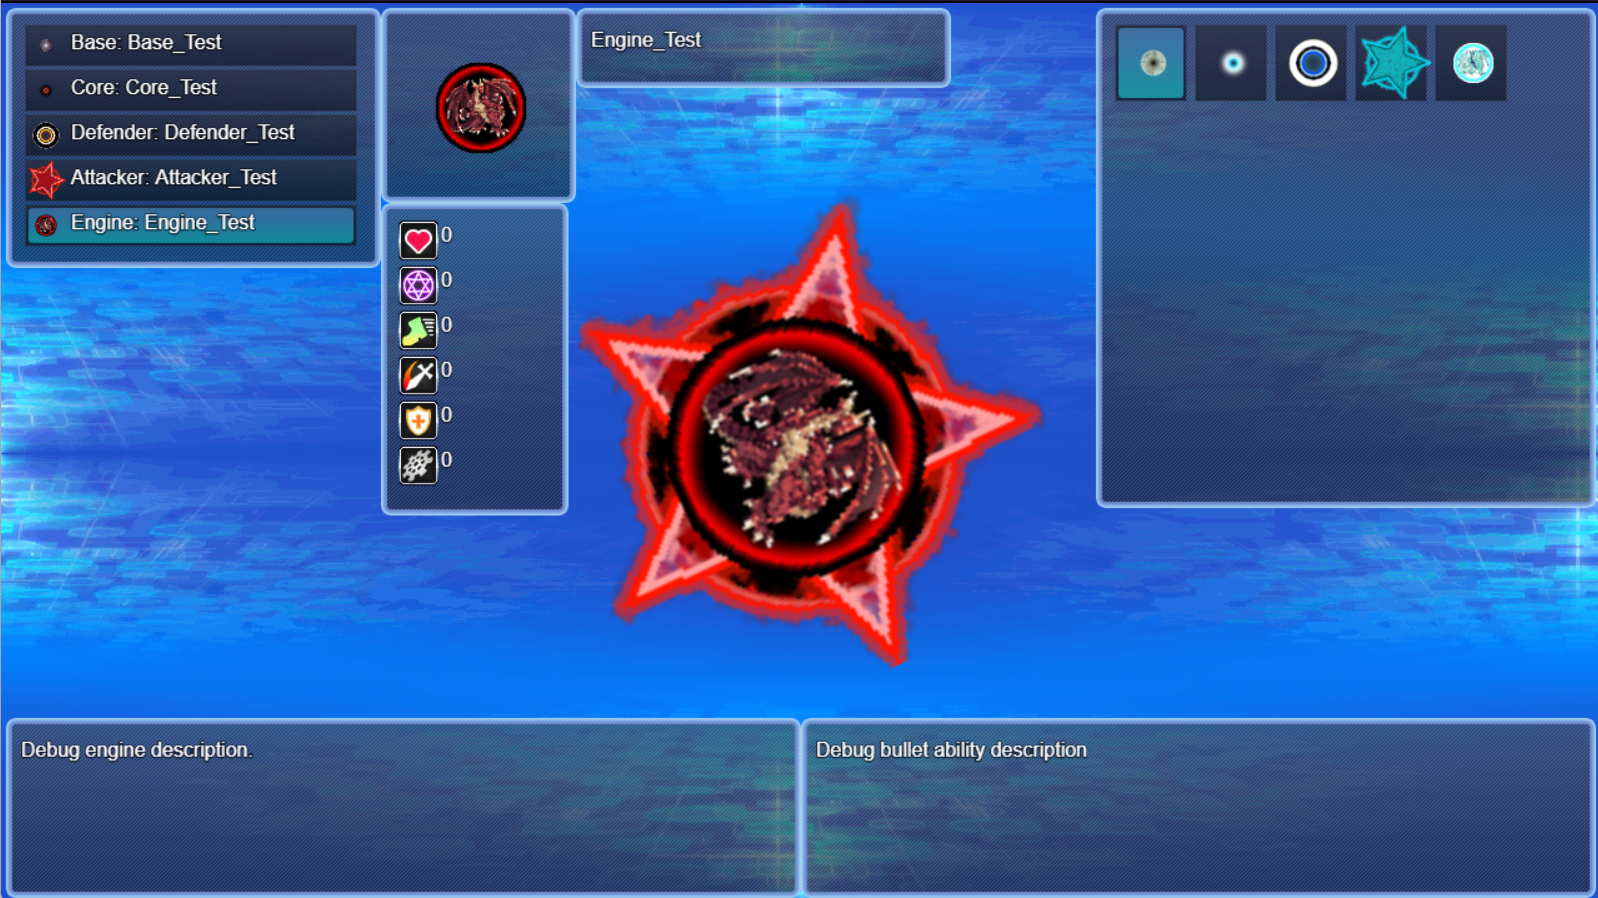
  • Projectile system (bullet, tackle, meteor, orbital, scatter)
  • Battle Start skill equip system
  • Party leader control (Other party members can help)
  • Arena colliders (Wall, Slow, Speed or even nothing)
  • Customize gust graphic
  • Customize shadow graphic
  • Visual Equipment system (For the battle spinner)
  • Three pre-designed AIs (chase, flee and smart)

Quick Setup

  1. Load the plugin into the project by placing it in the directory ./js/plugins/ and then by opening RPG Maker MZ, opening the plugin manager and loading it into the plugin list (if any).
  2. Create the folders in the ./img directory called: spinners, spinner_equips and spinner_arenas. These will hold the graphical resources for the spin top battle plugin
  3. Add an arena graphic and collider text file to spinner_arenas folder.  The arena graphic must match game resolution if using rect collider or must be a square with each side being the length of the project's width resolution if using circ collider for boundary.(Please see the project folder attached for an example and how to setup the graphic files). 
  4. In the plugin parameters, look for the section labelled 'Default Arena Settings' and set the arena graphic default and boundary default. Then, go to enemy spawn locations and actor spawn locations and set up the spawn points for enemies and actors. Please note that a position of X = 0 and Y = 0 is the center of the arena and is by default occupied by the player. For a resolution of 1280 x 720, an X position of 640 will mean the furthest right of the arena and -640 will mean the furthest left. for Y position of 360, it will mean the furthest downward position and -360 will mean the furthest upward position. The same rules apply when setting up colliders later. The attached project has these set up already for example use.
  5. Add a battle spinner graphic to the spinners folder. This is required and without it, the game will produce an error. This graphic is used to calculate collisions and as such, a minimal amount of blank space is necessary to avoid weird collision effect.
  6. Open project and go to database and for each actor/enemy that will be used in battle, apply the note tag <Battle Spinner: name> where name is the name of the spinner graphic added to the spinners folder. This is important as the game will throw an error otherwise.
  7. Setup an event on the map which has two script calls $gameTroop.setup(id) and SceneManager.push(Scene_BattleTop)
  8. Press cancel button to exit skill selection and enjoy the battle. Tip: You may want to have only one battler (1 actor and 1 enemy) to start the spin top battle. Having large amounts of battlers on the field can make it difficult to keep track of everything.

To setup colliders, refer to the following (an example setup is available for two battle arenas in the demo project):

Collider types are: "Rectangle" or "Circle"

Colliders use the following parameters:

- "Position X" = X position of the collider. This indicates offset value from the central line of the image.

- "Position Y" = Y position of the collider. This indicates offset value from the central line of the image.

- "Width" = Used for "Rectangle" collider. Determines the width of the collision box.

- "Height" = Used for "Rectangle" collider. Determines the height of the collision box.

- "Radius" = Used for "Circle" collider. Determines the circle radius.

- "Type" = Type of action collider takes. Includes: "Wall", "Slow", "Speed"

-- "Wall" Type acts as a solid collider. Battle tops will be rebounded on collision and inflict self damage.

-- "Slow" Type acts as an RPM drain and must be used with a JSON type: "Slow Value":"1"

-- "Speed" Type acts as an RPM boost and must be used with a JSON type: "Speed Value":"1"

- "Gust Ext" = Adds a file name extension to the gust image whilst the battler is on collider. 

-- Allows live modification of the gust graphic.

- "Shadow Ext" = Adds a file name extension to the shadow image whilst the battler is on collider.

-- Allows live modification of the shadow graphic.

{"Collider": "Rectangle", "Width": "60", "Height": "90", "Position X": "0", "Position Y": "0", "Remove State": "4"

The above is not used for test_1 map as it is missing the end curly bracket.

{"Collider": "Circle", "Position X": "-598.5", "Position Y": "0", "Radius":"37.5", "Type":"Slow", "Slow Value": "100", "Add State": "4", "Shadow Ext":"_none"}

When collision with above occurs, the battler has state 4 added and a constant RPM decrease of 100 is applied. Also modifies the shadow file name by adding

'_none' to the file name. You must have that file loaded in img/pictures for the gust graphic to change to such.

{"Collider": "Rectangle", "Width": "60", "Height": "90", "Position X": "0", "Position Y": "0", "Remove State": "4", "Type":"Speed", "Gust Ext":"_onColl"}

The above needs a "Speed Value" added to it which should increase RPM. Give it a try! To note, the one above also modifies the Gust graphic file name by adding

'_onColl' to the file name. You must have that file loaded in img/pictures for the gust graphic to change to such.


Some notes:

  • Nearest ally/Enemy will always be targeted. You may setup graphic for this in the plugin parameters
  • You can setup default arena graphic and boundary type in the plugin parameters
  • You are REQUIRED to setup actor and enemy spawns which are in the plugin parameters.
  • The coordinates x = 0 and y = 0 refer to the central position on the arena graphic. Negative x values reflect the left of the arena graphic whilst positive x values reflect the right.  Negative y values reflect the up -side of the arena graphic whilst positive y values reflect the down-side.

Before battling, the player will be prompted to equip valid spinner skills which is shown below:

A maximum of four skills can be equipped.

> Skill 1 = [Z] button

> Skill 2 = [Page Up] button

> Skill 3 = [Page Down] button

> Skill 4 = [Shift] button


To the top left of the screen, after selecting skills, you will notice this UI element.

HP reflects the actor's HP directly. If this falls to zero (0) the battle ends in defeat (Not necessarily game over if another actor is still alive)

MP reflects the actor's MP directly. It is used as a resource to cast skills and such.

To the right is the TP pool and RPM gauge. The TP pool expands as more TP is gained from skill use but the RPM gauge, if it empties, the battler instantly dies. Initial RPM value is the battler's max MP multiplied by 1000. If the battler has no MP, it defaults to 1000.

During battle, all battlers, (allies or enemies) will have a visible HP gauge which changes on collision or when hit with projectiles. The gauge fades away when the player is too far from it.

To the bottom of the screen, it will display the equipped spinner skills which are activated with [Z][Page Up][Page Down][Shift]

During battle, enemies and actors cannot leave the battle arena unless they are knocked hard enough to basically fly out of the arena.

Updated 19 days ago
StatusReleased
CategoryTool
AuthorSynrec
TagsRPG Maker, Top-Down

Purchase

Buy Now$25.00 USD or more

In order to download this tool you must purchase it at or above the minimum price of $25 USD. You will get access to the following files:

Spin_Top.zip 93 MB
Synrec_SpinTop.js 260 kB

Development log

Comments

Log in with itch.io to leave a comment.

Does this replace the usual battle scene or can this be implemented as a mini-game with a normal battle system?

I believe it does? It's quite an old plugin relying on external JSON file construction but I see it is picking up popularity so over this week I'll be doing some overhauls for it which includes removing it from being a battle system and acting more as a mini-game

(+1)

It's amazing what you can do witb this engine! I wouldn't be surprised if you came out with a functioning tower defense system next!

Thank you!

How do you get the game to progress if you lose? In the demo project, when I lose it plays the defeat image but then the screen remains focused on the arena forever and none of the buttons on the keyboard do anything... It's just stuck there until I close the game window. I can see in the Event where there's a "you stink" message if Switch 2 is turned on (when defeated), but I guess it's not activating for some reason? Just looked at the plugin settings, and you have "no defeat" set to TRUE, so everything should respawn for another game... Correct? Because that isn't happening either. I tried toggling that and the "Fully Recovery" option, but they have no effect -- the game simply locks up when I lose. I assume something isn't triggering the switch like it's supposed to.

(+1)

Checked out the issue, sorry for the inconvenience